Whatever size business you are, it's important to be able to measure the outcomes of your marketing efforts. In my view, it's even more important for small to medium sized businesses (SMEs) because most will have very limited budgets. This means that knowing what is working (and not working) is vital so that marketing budgets can be used as effectively as possible.
One barrier to accurate conversion tracking is that sometimes, web development changes are required to a website. This may be adding a "thank you" page or tweaking the HTML of a page to track downloads or interactions with a page.
Luckily, this is a barrier which Google Tag Manager is designed to overcome and it's one of our favourite tools at Aira. In this post, I want to explain how SMEs can use Google Tag Manager to track the most common types of conversions.
Types of conversion
While every business is different, most conversions can be classified as direct sales or leads. There are also micro-conversions but I'll be covering that in a future post.
1. Sales
This is the most obvious type of conversion that an SME may want to track. If you're an e-commerce SME, you simply must be tracking sales via your website. It sounds obvious, but you'd be surprised how many businesses come to us and aren't tracking sales.
2. Leads
Most common for B2B SMEs but not unheard of for B2C, the next type of conversion is a lead. This is typically a customer leaving their email address or phone number after showing interest in a product or service. Usually, this applies when the product or service is one that can't be purchased online and requires more discussion or customisation before the sale is made.
So how do we track these two conversion types? Firstly, we need to get a basic understanding of Google Tag Manager.
Using Google Tag Manager to track conversions
I could write an entire post introducing Google Tag Manager and how it works, but not only is that not the point of this post, but others have done a much better job than I'll ever do. If you're unfamiliar with Google Tag Manager and want to get started, I'd recommend reading the following:
- Intro to Google Tag Manager by iPullRank
- Beginner's Guide to Google Tag Manager by Optimize Smart
- Google Tag Manager Fundamentals from Google Analytics
- Google Tag Manager tutorial videos by Julian at Measure School
Once you've gotten the basics under your belt, you can go read anything that Simo writes.
Once you've absorbed the above, you'll be in a good spot to install Google Tag Manager and track conversions for your SME. So let's get into the detail for those.
Tracking sales using e-commerce tracking
If you're an e-commerce website, there is no excuse for not tracking sales. The data available when it is setup is rich and vital to seeing what's working and not working for you. You go from seeing sales data in your website CMS, to data like this which breaks down e-commerce data by traffic source:

Or going a level deeper and seeing exactly which products are selling best and segmenting that by traffic source:

There are a couple of steps you'll need to take to get e-commerce tracking setup via Google Tag Manager. The first is pretty simple and involves the following steps. Please note that I'll be going through the basic e-commerce tracking setup, not the enhanced one which I'll cover in another post.
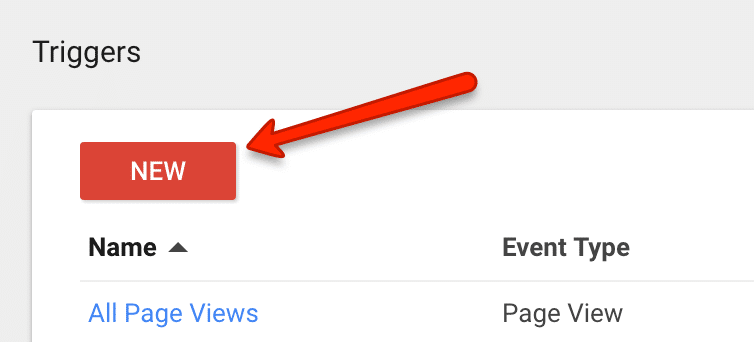
1. Log into Google Tag Manager and add a new tag:

2. Select Universal Analytics from that tag type list:

3. Name your tag, input your Google Analytics ID and select "Transaction" from the dropdown menu:

4. Then scroll down and click in the triggering section and click the plus symbol to add a new trigger:

5. Choose page view from the trigger type:

6. Next, name your tag, select "some page views" and then you'll need to define what page URLs you want the tag to fire on. This will be whatever URL a customer sees after they've purchased. This will most likely be some kind of "thank you" or "order confirmation" page:

7. Click save on the trigger, then on the tag itself and you're done! You'll just need to publish the tag or if you prefer, use the awesome preview and debug mode of Google Tag Manager to test the tag first.
Once you've done this, it can take 12-24 hours for data to start appearing in Google Analytics but when it does, you can find it in this section:

Now, that was the easy bit. Next up involves the help of a developer and some customisation of code based on how your CMS processes transactions.
In order to capture data from the transaction, you need to pull data into the dataLayer so that Google Tag Manager can see it and send it to Google Analytics. There is a detailed step by step here from Google but basically, your developer will be adding a dataLayer to the order confirmation page which looks something like this:

The good news is that this only needs doing once.
The third and final step is to enable e-commerce reporting in your Google Analytics account which is very easy. You can find the setting in this part of your Google Analytics admin section:

Then simply toggle this setting to on:

That's it! Simple, right?
Being serious, it is actually a pretty straight forward process and you'll just need a good developer to handle step 2.
Tracking leads in Google Tag Manager - form submissions
If a conversion on your website is someone getting in touch with you via form, then tracking how many people do this and knowing how they found your website is vital. At Aira, we have a form at the footer of many pages and on our contact page. We actively track how many times this is used and every so often, will look at these against traffic sources to see where our leads come from:

Tracking forms is pretty easy because Google Tag Manager has a specific feature called a form submission listener which we can use. All you need to do is identify an attribute of your form submission which Google Tag Manager will "listen" for and fire when it hears it. This is where every website can be a little different, but I'll show you how we've set this up on aira.net and that should give you enough to track your own forms.
1. Firstly, open up Google Tag Manager and setup a new trigger:
2. Select form submission from the trigger types:
 3. Name your trigger and configure it to fire on all forms:

4. This may seem strange, but we're doing this so that we can find exactly what variable we can use to track our form submissions. So next, go to the preview and debug mode in Google Tag Manager:

5. So next, go to your website in a new tab, and you should see a pane at the bottom of the window:


6. Next, we need to submit your form and see what data is sent into the dataLayer. From here, we can grab one of those variables and use it to trigger a form submission tag.
To do this, simply go to the page where your form is located, fill it out, click submit but as soon as you do, press ESC on your keyboard straight away.
Once you've done this, select the gtm.formSubmit option from the left and then click on variables. When you scroll down, you'll see something like this:

So for aira.net, I can use the bit in red, know as the Form ID variable and tell Google Tag Manager to only fire the Form Submission tag when this is present in the dataLayer. This ensures that the tag only fires when a form has actually been submitted.
To do this, go back to the trigger you setup previously called the Generic Form Submission Listener, and edit it like this:

Here, we're simply changing the tag so that it only fires when the Form ID in the dataLayer contains "gform_1".
Note that if you have different forms across your website for different purposes, they may each need tracking separately if you want to record them separately. For your own website, the Form ID is likely to be different to the one above, but the principle is the same.
Now that we know form submissions are being tracked, we need to fire the data into Google Analytics and track it as a goal.
To do this, we first need to fire a Google Analytics event which we can do within Google Tag Manager.
Firstly, setup a new tag, selecting the type of Universal Analytics. Then input your Google Analytics ID and select Event from the dropdown menu:

Next, you need to define how the event will be labelled in Google Analytics. This is totally up to you but here is an example:

Note the "Label" field. Here, I've set the event to pull in a dataLayer variable from the option on the right-hand side. In this case, I've selected page URL. This is because on aira.net, we have the contact form on a number of pages, so this setting will allow me to see which page someone was on when they submitted the contact form. This is purely optional and may not be needed for your own configuration.
Once you've done this, scroll further down to the triggers section:

Here you need to select the trigger which you setup earlier for the Form submission:

Just one final step now, you'll need to head over to the admin section of your Google Analytics account and setup a new goal:

When you select new goal, you'll need to select custom:

Next, name your goal and select event:

Now the important bit, you'll need to name your goal in line with how you named it earlier when setting up the Google Analytics event tag:

Click save, and you're done!
Tracking leads in Google Tag Manager - email addresses
It's quite common for visitors to your website to be able to get in touch via an email address as well as a contact form. You can see this on our own website in the footer:

We want to be able to track the number of people who click on this because some of them will prefer to send an email instead of submitting a form. Fortunately, we can do this via Google Tag Manager.
The one thing to note here is that we can only track clicks on the email address, we can't track if someone actually sends an email via Google Tag Manager. So it's perfectly possible for someone to click on the email link, open their email program and then not email you. It's also possible that someone could copy your email address and paste it into their email program without clicking your email address link at all. Therefore, you need to take this number with a pinch of salt when viewing it in Google Analytics.
Tracking clicks on your email address is super easy though and you just need to follow a few steps.
1. Setup a new trigger and select Click type and just links:

2. Now set the trigger to fire on some link clicks:

3. Now you need to look for a dataLayer variable for clicks on email links. Fortunately, just about all clicks on email addresses have "mailto:" in the link, so you can look for this:

4. Click save.
Now, you need to setup a new Universal Analytics event tag like we did earlier for form submissions. The only difference this time is that you need to name the event slightly differently so that it records as an email submission and not a form submission:

Notice that again, I've set the event label to pull in the Page URL because our email address is on lots of pages across the website.
The final step, like on form submissions, is to setup a new goal in Google Analytics which looks for this event and records it as a goal.
Tracking phone calls
Finally, if you have a phone number on your website, you should also be tracking this and the easiest way to do this is via a 3rd party call tracking service. At Aira, we use Infinity Call tracking which works very well and can tell us the traffic source for all phone calls.
If you're not familiar with call tracking services, they generate a new phone number of each type of traffic source that you want to track. So a visitor from Google Ads will see one phone number, while a visitor from social media will see a different one.
That's about it! If you have any questions, feel free to get in touch, tweet me, or send me a message on LinkedIn and I'll be happy to help.