
If you’re like most business owners and are using Facebook to communicate with your prospective and existing customers, you may well have heard of Business Manager.
Sure, you can manage your Page and run some basic ads just from your personal account, but there’s a whole lot more on offer. Business Manager offers a huge range of additional features, insights and tools all in one place
Who’s it for?
If you have a Page for your company currently and perhaps occasionally boost your posts to extend your reach, now is the perfect time to migrate to Business Manager and unlock a ton of additional Facebook advertising tools, Page insights and be able to manage your comments and messages away from the distraction of your personal account.
In this guide, we will talk you through how to set up a Facebook Business Manager account, link your Page, create an ad account and how to then allocate permissions to your team (or an agency like Aira ).
Business Manager
You will need to use your personal Facebook account to confirm your identity. Once this has been done, notifications and emails can sit away from your personal newsfeed, leaving you free to scroll and watch as many cat videos as you can find.
Ideally, you will be the Page owner to do this initial setup, as it will mean the Page can be linked without needing to request access.
So head over to business.facebook.com and click ‘Create an Account’. You will first be asked to enter a name for your business and then your own name and company email address (this is where notifications regarding your Pages, ad campaigns etc. and billing will be sent).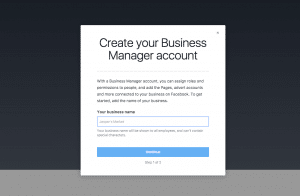
Adding your Page
Congratulations! You now have a Business Manager account. That was fairly easy, wasn’t it?
Let’s get your Page (or Pages) added so we can start making use of these new tools and features.
Anyone who has admin access to your Page currently will still do so once you have transferred it to Business Manager.
- You should be seeing a screen something similar to the one just below here. There are three panels: Page, Advert account and People. Click ‘Add Page’ in the first panel.
- You will be given three new options: Add a Page You Own, Request Access and Create a New Page. We are going to assume you are the Page owner for this guide, so click ‘Add Page’ in the first panel.
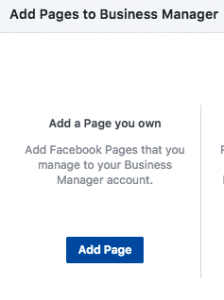
- Now, you are able to search for your Page by typing out the page name, or you can open your Page in another tab in your browser, copy the URL and paste it into the search bar. Once you have found your page, click ‘Add Page’.
Once you return to the Business Manager home screen, you will now see your page under a ‘Pages’ heading. It’s worth noting at this point you can add multiple Pages to a Business Manager account. To add more Pages that you own, just repeat the same steps.

Let’s say you have five nationwide branches, each with a separate Facebook Page – you can add them all into your Business Manager account and then allow access to employees to also create posts, see insights, and respond to users quickly and easily from one place.
You can also now manage your Instagram comments and direct messages from within your Page here, providing you link the account to Business Manager.
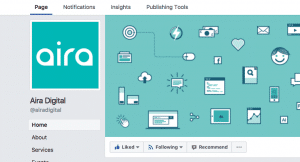
Just click the Page you need to work on and you will be taken to the familiar looking admin side of your Page. See your notifications, reply to comments as your business, create posts and much more.
Creating an ad account
Now your Page(s) are in your Business Manager account, the next thing to do is set up an ad account so you are ready to start running paid media campaigns. You can create up to five ad accounts per Business Manager account and request access to any other existing accounts you work on.
Creating an ad account is worth doing now, even if you don’t plan to start running campaigns just yet, so it’s set up for when you are ready.
Note: If you already have an ad account, you can transfer this over to your new Business Manager account, which is easy enough to do - just follow guided steps in the account.
- If you need to, navigate back to the Business Manager homepage by clicking the Facebook icon in the top left-hand corner of the page.
![]()
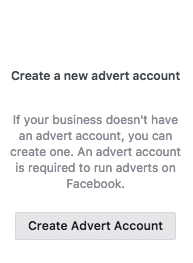
- You will see a second panel (next to where you added your page in the last section) - ‘Advert account’. Click the blue ‘Add Advert Account’ button.

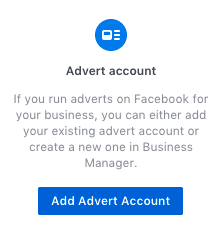
- You will see three new options open again. As mentioned, this part of the setup is for people without an advert account, so click the ‘Create Advert Account’ button in the third panel under ‘Create a new advert account’.
- Give your advert account a name, select the business the advert account will be advertising on behalf of, select your timezone and finally your currency for billing.
- The next step will allow you to give access to this advert account. There are various different tiers of access you can give. Click ‘Skip’ for now as we will cover this later in the guide.
The account is now set up! You won’t be able to run any campaigns just yet though, so let’s sort that before we go any further.
Billing
To run campaigns with your shiny new ad account you will need to add some billing information.
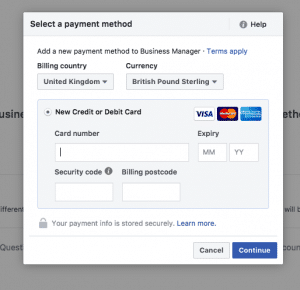
In the top left corner of Business Manager you will see a burger icon. Click this and a drop-down box will appear.
![]()
Click on ‘Billing’, click ‘Add Payment Method’ and enter your payment details.
With a valid payment method linked, you are now ready to use your ad account to run campaigns and grow your business!
Adding people
Now you have a Business Manager account, your company’s Page is linked and you have an advert account ready to run campaigns.
The final thing we are going to look at is how to give people permissions. You will no doubt have in-house members of staff who need to work on your Pages and/or Advert account, so let’s give them access to your Business Manager.
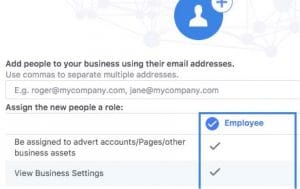
- Head back to your Business Manager home page and click the third and final panel - ‘People’. Click the ‘Add People’ button.
- The first set of permissions are for the Business Manager account. Enter the person’s company email address and select their permission level.
- The second set of permissions are for Pages. There are various tiers of permissions available - if you’re unsure check out what they all mean on Facebook here.
- The third set of permissions are for advert accounts. Similarly to Pages, there are various tiers of permissions available - if you are unsure check out what they all mean on Facebook here.
- The fourth set of permissions are for Product Catalogs, which you won’t have at this stage (and might not need anyway), so click ‘Skip’.
This person now has access to everything you wanted them to have access to and an email will be sent to them inviting them to use your Business Manager. You can add further people or adjust permission levels in your settings any time.
What’s next?
Now that you have your main assets set up you can start to explore some of the more advanced features of Facebook advertising, such as adding a Pixel to your website so that you can retarget visitors and track conversions such as purchases or leads.
Doing this means that you’ll be able to use conversion campaigns to drive business goals, create lookalike audiences of your existing customers to find more in-market opportunities, and also exclude people who have converted from your campaigns to save wasted ad spend and keep relevance high.
Having a Business Manager account will also allow you to do other cool stuff like create a catalogue and run product ads if you’re an ecommerce business, tag your products in posts and much, much more.
You’ll also see in the settings tab (if you click the cogwheel in the top right corner) you can assign access to everything in your account to a paid media agency partner, which makes life really easy when it comes to outsourcing your paid social activity.
Conclusion
You’ve now no doubt got plenty of new tools and features to explore - I haven’t covered everything, but I have covered the key parts you will need to drive business growth.
Want to know more about Facebook ads? Why not get in touch and see what else we can do for you? I want to speak to you, you rock.